Types of Grout
The most common grout used for man-made tiles is sanded grout. This is a blend of Portland cement and sand. You can feel the presence of the sand to help identify this type of grout. The width of the grout line also aids in identifying the type of grout. Normally sanded grout is used when grout lines are 3/16” or wider. Sanded grout is appropriate for ceramic tile.
It should not be used on stone floors, although it occasionally shows up there due to inexperienced installers. If you encounter sanded grout on a stone floor – BE CAUTIOUS! Sand can scratch most stones and play havoc on a polishing job.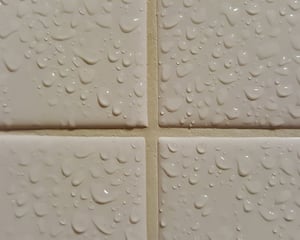
Unsanded grout is also made from cement but without sand. It is great for natural stone flooring. There are two reasons for this. First particles of sand from grout could scratch and abrade stone surfaces. Second, the unsanded grout is better suited to filling narrow grout lines in stone installations.
Epoxy grout, although not common, resists staining and soil. It can be identified by a plastic-like appearance that is frequently rounded on top. NOTE: Cementitious grout with epoxy added will also resist staining and be easier to clean but it is not the same as 100% epoxy grout.
Other types of grout such as Furan may be used in special situations such as counters where food is prepared. These specialty grouts clean up very well, but unfortunately, you won’t see them very often.
Grouts may contain additives to provide color, make cleaning easier, or extend the life of the grout. Your initial inspection of a job should include examining the grout. Cracks may be present due to movement of the substrate, installation and mixing issues, or rarely the quality of the grout itself.
Sections of grout that have broken loose due to these cracks can be blasted out by high-pressure cleaning and vacuum. Clients should be advised of this possibility.
Basic Cleaning Procedures for Stone, Tile & Grout
Preventive Maintenance
Regular use of walk-off mats reduces tracking of soils from outside. Mats can remove abrasive grit from shoes that are especially harmful to most stone surfaces. Regular sweeping, vacuuming or dust mopping of the floor is important to remove sand and other particles soils off the floor should it get past the mats.
Routine Daily or Periodic Maintenance for Tile and Stone
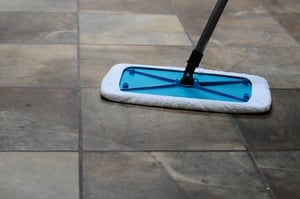
- Sweep or vacuum the floor to remove particle soils. An untreated microfiber dust mop is suggested.
- Mix neutral tile and/or stone cleaner at 2 to 4 ounces per gallon. Terrazzo and ceramic tile. A cleaner safe for stone does not contain any of the chelating agents commonly found in off-the-shelf consumer products or products meant only for tile. Chelating agents help soften water by binding to and separating minerals found in hard water. An issue arises because the chelating agents don’t know the difference between calcium in the hard water and calcium that is part of the stone. They can be more difficult to rinse from stone and can leave the floor cloudy with repeated use.
- Apply with an electric or pump-up sprayer or mop if preferred. A microfiber mop or a rayon mop with looped ends and a sewn tail band is suggested.
- Allow solution 2-3 minutes dwell time.
- For best results, heavily soiled areas may be agitated with a grout brush or other tool, but this is seldom necessary with regular maintenance.
- Extract the cleaning solution and soil with a wet vacuum or clean mop. If the mop is used, change your mop water often to make sure that the soil is not redeposited.
Restorative Cleaning for Tile and Stone Floors and Walls
Used for heavier build-up of soil, especially greasy or oily soils, when more than routine cleaning is required. Wear appropriate protective equipment when handling concentrated cleaning agents. Be sure your work area is well ventilated. Keep children and pets out of the work area until the floor has dried.
- Sweep or vacuum the floor to remove particle soils.
- Gritty soils left on the floor can scratch stone surfaces. An untreated microfiber dust mop is suggested. Protect surfaces not being cleaned so that they are not damaged by splashes or spills. It does not take much liquid under an MDF baseboard to do permanent damage.
- Mix alkaline stone cleaner according to label directions. Dilution can be adjusted according to the level of soiling. Use hot or warm water if available.
- Apply evenly and liberally using an electric or pump-up sprayer or mop. Allow several minutes of dwell time, but do not allow the solution to dry on the floor. If using a mop, change the cleaning solution frequently to be sure soil is not redeposited.
- Grout lines may need to be agitated with a grout brush.
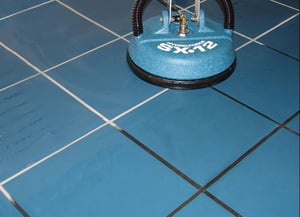
- Use SX-12 or SX-15 with brush bottom to agitate, rinse, and extract dirty solution all in one step. The SX-7 or the Gekko line of accessories will be helpful when cleaning countertops, walls, along edges, and in tight places. For sensitive surfaces use the Hydro-Force Gekko tool with a brush or squeegee head.
- After the floor has dried, proceed to instructions for sealing and protecting the surface.
Acid Cleaning for Tile & Grout
CAUTION! This process should not be used on any stone floors containing calcium. Acids can etch limestone, travertine, marble, terrazzo, and any stone containing calcium. Acid cleaning is mainly for ceramic tile and grout.
Acid cleaning removes mineral deposits, soap scum, hard water deposits, urine stains, efflorescence, and rust. It can also remove other stubborn stains from grout because it is actually removing a microscopic layer of the grout. Acid cleaning is most effective when it follows restorative cleaning with an alkaline cleaner. Repeated use of acid cleaning or leaving an acid cleaning on the floor without rinsing or neutralizing will soften grout over time.
- Sweep or vacuum the floor to remove particle soils. An untreated microfiber dust mop is suggested.
- Protect surfaces not being cleaned so that they are not damaged by splashes or spills. Metal surfaces, especially stainless steel may be etched by contact with an acid solution.
- Mix acidic restorative cleaner following label directions. Dilution can be adjusted for lighter soiling. Apply with a clean mop, sponge, towel, or sprayer. Avoid getting the solution on unintended surfaces. Allow several minutes of dwell time, but do not allow the solution to dry on the floor.
- Agitate solution as needed with a grout brush to assist the cleaning process.
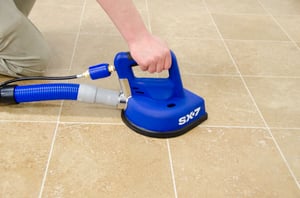
- Use SX-12 to agitate, rinse, and extract the dirty solution all in one step. The SX-7 or the Gekko line of accessories will be helpful when cleaning countertops, walls, along edges, and in tight places. The solution can also be removed with wet vac, mop, or sponge.
- For grout lines, spray on a solution of alkaline pre-spray weak dilution. This step is important to neutralize acid residues. If either cleaning solution gets on a metal surface, immediately rinse with clean water and wipe dry.
- After the floor has dried, proceed to instructions for sealing and protecting the surface.
Maintenance for Countertops
A safe, gentle process for removing everyday soil and grime while also protecting the surface and rejuvenating and preserving the high shine.
- Spray the surface with a neutral stone cleaner mixed according to the label directions.
- Wipe and clean the surface with a clean, white cotton cloth.
- Buff to a high shine with a clean dry cloth.
Sealing Procedures
All stone, grout, and porous tile should be sealed using an impregnating sealer to protect the surfaces while preserving the natural appearance. Porcelain tile will not absorb sealer. Most ceramic tile has a glazed top surface and will not accept a sealer. The sealer will simply dry on the surface and leave a haze.
- If the floor has been subjected to traffic since cleaning, sweep or vacuum the floor to remove particle soils.
- Protect surfaces not being sealed.
- Apply an even coat of an impregnating sealer using a slightly damp rayon mop, a roller, or sprayer. To bring out the natural colors of stone, especially slate, and provide a “wet look” shine, seal with a stone enhancer For porcelain, glazed ceramic, or other non-porous tiles, apply an impregnating sealer for grout to the grout lines only. If efflorescence is a possibility, a solvent-based impregnating sealer prevents efflorescence resulting from water while providing a high level of protection against common household food and beverage spills along with other stains and soil. There are a variety of tools to help you seal any floor. Grout Stick is designed for applying solvent-based sealer to the grout lines. Any sealer that gets on the tile should be wiped off before it dries. For large areas of tile, spread the sealer using a clean moss rubber squeegee. When the seal has completely dried, this can be followed by a rotary floor machine fitted with a white pad. This will remove excess sealer while helping polish the surface.
- An optional second coat may be applied to porous stone after the first coat has dried.
by Scott Warrington
Featured Products

Hydro-Force, Hard Surface Cleaner, Viper Renew Restorative Tile & Grout Cleaner, 1 Gallon
Hydro-Force, Hard Surface Cleaner, Viper Venom Tile & Grout Cleaner, 1 Gallon
Hydro-Force, Viper Prestige Impregnating Sealer, Solvent Based, 1 Quart